Brahma (original)
Origins
Over the years Umashankar Manthravadi Reported to the Sursound list his experiments in making a tetrahedral microphone using commodity capsules. We were shown how he designed a 3D-printed mount for them, and his plans to attach this to the top of a Zoom H2 recorder in place of the four microphones put there by the manufacturer. In the end this led to a Kickstarter campaign leading to the manufacture of the Brahma range of microphones, which could be bought as free-standing units or built into the later Zoom H2n (a version with a fitting on the top of the H2n to mount the free-standing microphone was also offered). The units ordered as part of the Kickstarter were delivered in the summer of 2014, and I received my microphone in July of that year. They have been available for sale since then, but recently plans to change the manufacturer have been mentioned.

What I received
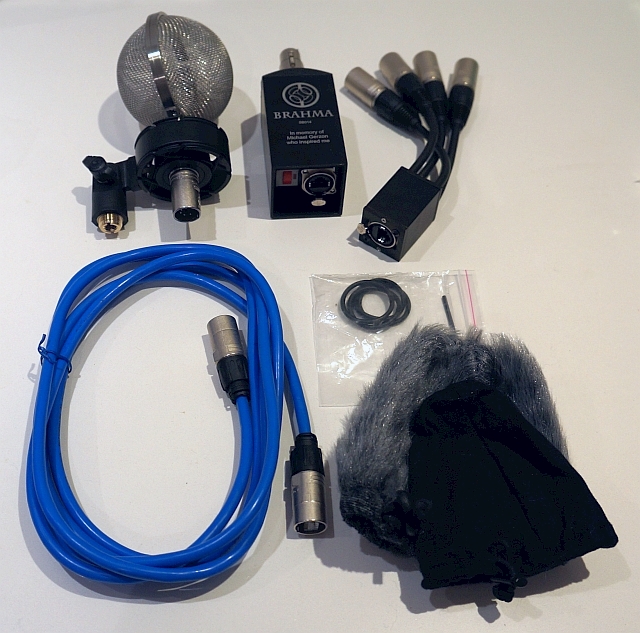
Inside the packaging was a nice wooden box with a separate nylon cover to protect it. Sadly, the contents were simply wrapped in protective materials; there was nothing like foam with cutouts to hold the various parts in regular use.
Inside the box was the microphone itself, with a shockmount and windshield; a separate preamp unit with output via a screened ethernet socket, a 3m screened ethernet cable (very stiff), and a unit to break the signals from the ethernet cable to four balanced XLRs. There were also spare rubber loops for the shockmount and an Allen key. An email arrived the same week with the calibration files for my microphone and a copy of the program called Brahmavolver which uses them in converting the A-format microphone signals to the usual B-format.
Construction and Assembly
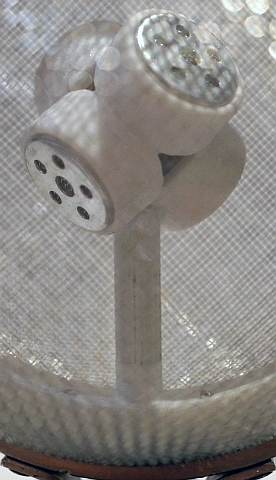
The microphone capsule assembly is, as mentioned above, a compact 3D-printed affair. This is mounted inside a mesh sphere (about the size of a Rycote Baby Ball windshield) on the top of a long XLR plug. This is quite nicely finished, but not very robust - normal handling is fine, but it would be comparatively easy to damage.
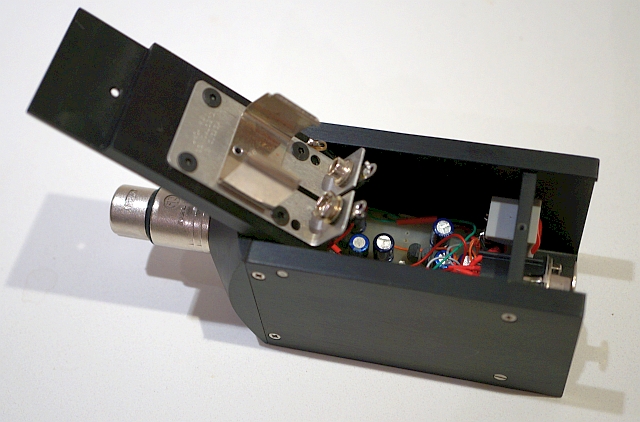
The preamp assembly is quite substantial, not least because it has space for a 9v battery. Although the main part is metal, the domed top holding the microphone connector and the bottom plate holding the Ethercon socket and the battery power switch (with indicator light) are made of a hard plastic.
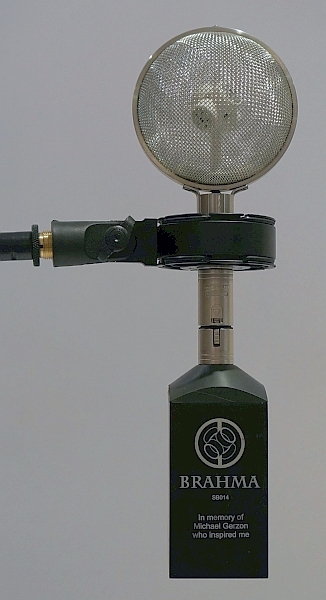
When the microphone is plugged into the preamp unit the whole assembly is large, and looks rather ugly and intrusive on a microphone stand. If the preamp box was replaced by the Zoom H2n with the connector on top it would look quite similar (the H2n is a bit larger but much lighter), but the package would be very practical in some ways - apart from the lack of access for starting and stopping recording.
The writing below the logo on the preamp was an option which Kickstarter contributors could choose to specify individually.
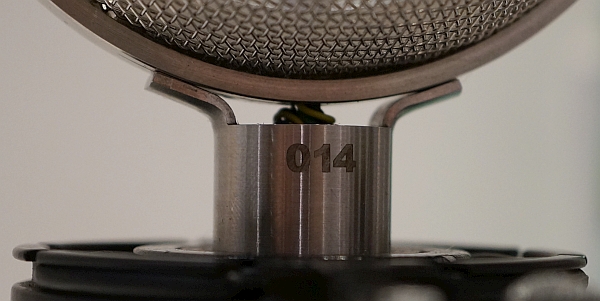
My microphone has the serial number 014.

Software
The software supplied for the Brahma is a stand-alone program called Brahmavolver, and was supplied by Angelo Farina (however, he himself has said on a mailing list that the program has some serious defects, not least, that the output is always only 16-bit). It takes the four signals presented as two stereo files (because that's the format used in the H2n), and generates a choice of B-format (traditional FuMa type) or 5.1 output, which can be in mono, stereo or multichannel files. The calibration file details are not visible in the screenshot because they are specified in a preferences dialogue. It seems to work just fine, of course, but Angelo has recommended the use of his X-volver plugin instead.
In any case, if your workflow leads you to prefer a plugin you can use X-volver as Angelo suggests; however, it is only 32-bit. The best option now is the new VVEncode from David McGriffy, which will handle the Brahma conversion files as well as those produced by Core Sound, and also provides for different microphone orientations.
Front, back, and sides
The picture of the combined microphone assembly above looks just as you'd expect, with the front of the microphone towards the camera, and the usual capsule arrangement starting with LFU.
But no, that's not how it is! For reasons that I was given, but won't repeat as they seem irrational, at a late stage it was decided to make the front of the microphone is 90 degrees different from that. There is a red line on the circular ring holding the mesh indicating which side of the microphone is considered the front.
Of course, this rotation means that the capsules are now LFD RFU LBU RBD instead of the usual LFU RFD LBD RBU.
The documentation is also confused about the order of the channels - suggesting that it is the reverse of normal. I have also seen a mail suggesting that it is the usual order but the outputs are labelled 4, 3, 2, 1 instead of 1, 2, 3, 4!
Finally, examination of the filter matrices I was sent shows that they appear to match the usual capsule layout rather than the new one (judged by which impulses are positive and which are negative) - which suggests that my filters were not adjusted for the supposed new orientation of the mic! However, I have no means to verify which filter belongs to which capsule in any absolute way.
Noise problems
I decided immediately that I had to separate the preamp from the microphone and mount it directly on the stand, so a made up a short cable with thin wire - this is a similar arrangement to the Core Sound PPAc setup, and is suggested in the introductory document I received. I then used a Rycote InVision shockmount to hold the microphone itself - the provided shockmount is quite stiff (it needs to hold the preamp as well), and one of its bands broke the first time I set it up.
However, my first attempt to record was a disaster. There was hum and noise way beyond anything acceptable. It turned out that a major cause of this was using phantom power (supplied by a MOTU 8Pre USB), and that using battery power reduced this a lot. But there was still hum and interference pickup. The microphone was unusable.
I contacted Umashankar, and after investigation he sent me new preamp boards to a different design, which I mounted in the box myself (for personal reasons there was a delay of about a year before I finished this). I also found that the wiring of the ethernet sockets was inappropriate - the hot and cold for each of the balanced signals were not connected to the two wires of a twisted pair in the ethernet cable, which could help explain the hum and interference pickup. After installation, and careful rewiring of the ethernet sockets to ensure that each balanced signal was transmitted across a twisted pair (which was pretty fiddly!), the microphone was greatly improved. There is still rather more noise when using phantom power than when using battery power, but on battery power the outputs are just slightly quieter than those of the TetraMic. I suspect that the somewhat larger diameter capsules are the main reason for this.
Taking the preamp assembly apart also exposed a weakness in the design, in that the plastic parts were fixed using thin bolts rather than, say, self-tapping screws. This meant that the threads in the plastic stripped even with the care I took. However, the plastic parts are held quite tightly by the three sides of the main metal casing, so this is not as big a problem as it might have been. I hope that the expected change of manufacturer will be accompanied by some reconsideration of physical design details of this kind.
Samples and Conclusion
The combination of the preamp noise troubles and the uncertainty about the capsule orientation and channel ordering means that sadly I have not actually used this microphone - so there are no samples to offer you.
I am going to make an attempt to work out the correct channel and filtering settings, but cannot be sure if I will succeed! The channel ordering could have been easy, but verifying which filter values belong to which capsule may not be possible.
(I'm determined to get this working correctly somehow, but sadly, my latest attempt to work on it has found one channel not working - so it's back to the soldering iron! This is almost certainly my own fault, though.)
UPDATE:
The manufacture of this microphone has been stopped. The packaging and electronics have been redesigned, and the manufacturing of the new version will be in a different place. This report is therefore of only historical interest and should not be taken as a reflection on the new version.