Recording Native B-format
The Microphone
My ambisonic recordings up to July 2007 were made using a native B-format microphone made up of three AKG Blue Line capsules (i.e. separate capsules for the W, X and Y signals). I chose these because they were the only range that I could afford that included fig8 capsules (and I found suppliers that had mispriced these fig8 capsules as cheap as the other patterns when they should cost more than twice as much!). I now have a Core Sound TetraMic - the poor man's soundfield, which you read about in some other pages on this site.
I tried several physical arrangements of the microphones, to suit the brackets and clips I had available at various times, but finally settled on one arrangement that I will describe here.
Superficially, as the photos below show, the arrangement looks like that developed by Dr Halliday for Nimbus, and still used by them more than two decades on. However, there is a difference which a number of other people have suggested, but no-one else seems to have tried, and that is the placement of the omni capsule pointing vertically up instead of forwards. The rationale for this is to give the W signal a uniform response in all directions in the horizontal plane, instead of a poorer one to the rear. As the response at 90 degrees off axis is somewhat down at high frequencies, I give it a little boost to correct it, which is rather similar to the common "diffuse field" correction (see the more detailed discussion later).
The only other consideration is getting the capsules as close together as possible, to minimise HF anomalies for sounds out of the horizontal plane (like reverberation in particular). The AKG fig8 is not good for this, as it has a rather extended body beyond the capsule.
Now that my Core Sound TetraMic has arrived, this microphone arrangement has gone out of the window, for me at least, to be replaced by a properly designed and equalised tetrahedral soundfield microphone which is a lot less intrusive on the stand as well. However, the notes on my recording setup are still applicable.

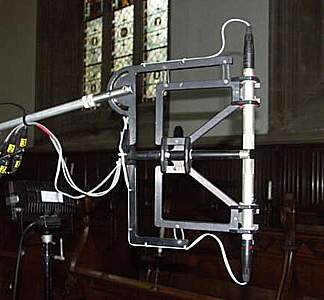
Native B-format microphone arrangement made up of AKG Blue Line microphones, as described in the paragraph above
 Native B-format microphone designed by Dr Halliday for Nimbus, shown here for comparison
The Preamp and Computer Interface
I use a MOTU Traveler firewire interface. This is in any case quite a good quality unit; but it has the particular benefit for recording B-format that it has four microphone preamps, and the gains of these are digitally controlled so that they can be set reproduceably. It can be battery powered, but I don't do that, as I don't trust the laptop's battery to run long enough either.The Computer
The laptop which I take out for location recording is an obsolete Dell Latitude X300 running Windows XP. This is extremely small and light, but has a 4-pin firewire port built in; it also has an unusually quiet cpu fan. More to the point, I have two fully functional spares, so I am well provided for the immediate future. The disk is a slow one (5400 rpm) for quietness, but this gives no cause for concern over performance, even when recording five tracks (W, X, Y and a stereo mix); because it is a large capacity drive (80GB) the packing density means that the transfer rate is relatively high.The Recording Software
Here I depart more radically from convention. When recording in stereo, I have in the past used Cool Edit 2000 (which had the disadvantage of recording to a temporary file), and more recently WaveLab (which has better metering and can record directly to a final file).
However, for surround recording I have chosen to construct my own software recording console, almost in the manner of designing a small mixing desk, using AudioMulch and a number of VST plugins (see the image below). An alternative to AudioMulch is Plogue Bidule, which is also available on the Mac platform - but I have not found this as easy to get on with, and its built-in file recording facilities aren't as flexible as those in AudioMulch, though they do have the advantage of being able to write Wave-Ex files.
Recording 24 bits (saved as 32-bit floating) means that there is plenty of headroom, so I can safely use the BBC-style PPM metering that I was trained to - the plugin that does that is called PPMulator, and can provide the number of channels required (OK, so I just like the look of the PPMs!).
For monitoring, I use a copy of VVMic VST to generate a stereo signal, and I also record this for instant playback purposes; sometimes I have a phase display of the stereo signal, as in the screen shown below.
AudioMulch does not write Wave-Ex files, and three-channel 32-bit files get so big that I cannot record a whole concert without hitting the file size limit (2GB in both AudioMulch and WaveLab, though properly 4GB should be possible using unsigned arithmetic for the size). So I record W, X and Y to separate mono files. As the first thing I do with them afterwards is equalise them individually to compensate for the variations between the microphone capsules, this is actually quite convenient. In the AudioMulch setup illustrated below I have also added a gain element that reduces W in line with the B-format specification; however, this is as easily done as part of the alignment and correction processing that is done after the recording.

Choice of sampling rate
I am no great believer in the advantages of very high sampling rates (by which I mean 96kHz and 192kHz). I do believe in the audible superiority of 48kHz over 44.1kHz, but none-the-less I usually record at 44.1kHz because my final product is currently always a CD, whether encoded in UHJ or DTS format.